Distance learning……I know some kids are thriving while learning from home and other’s are struggling. Whether you love it or could leave it, the common thread is that our kids are sitting in front of computers for long hours every day resulting in an abnormal amount of aches and pains and increasingly poor posture. With so many students spending unprecedented long hours on their computers to keep up their grades, experts are reminding parents that without a proper home workstation, remote learning may cause aches and pains and potentially lead to injuries over time.
According to a Facebook survey earlier this year from the American Chiropractic Association, 92% of chiropractors said patients are reporting more neck, back, or other musculoskeletal issues since the pandemic began. Kids are no exception. Students could be even more at risk, since they often do their school work from bed or the floor, slumped over screens for hours at a time.
Thank goodness we have yoga to help combat these issues!!! Today I am going to share some great yoga poses to help ease those aches and pains as well as improve posture while our kids continue to learn from home.
Child’s pose
Child's Pose (Balansana) is yoga's most important resting posture and it is a nice way to gently stretch various parts of your body. Child's Pose is a gentle stretch for the back, hips, thighs, and ankles. It can help relieve back pain.
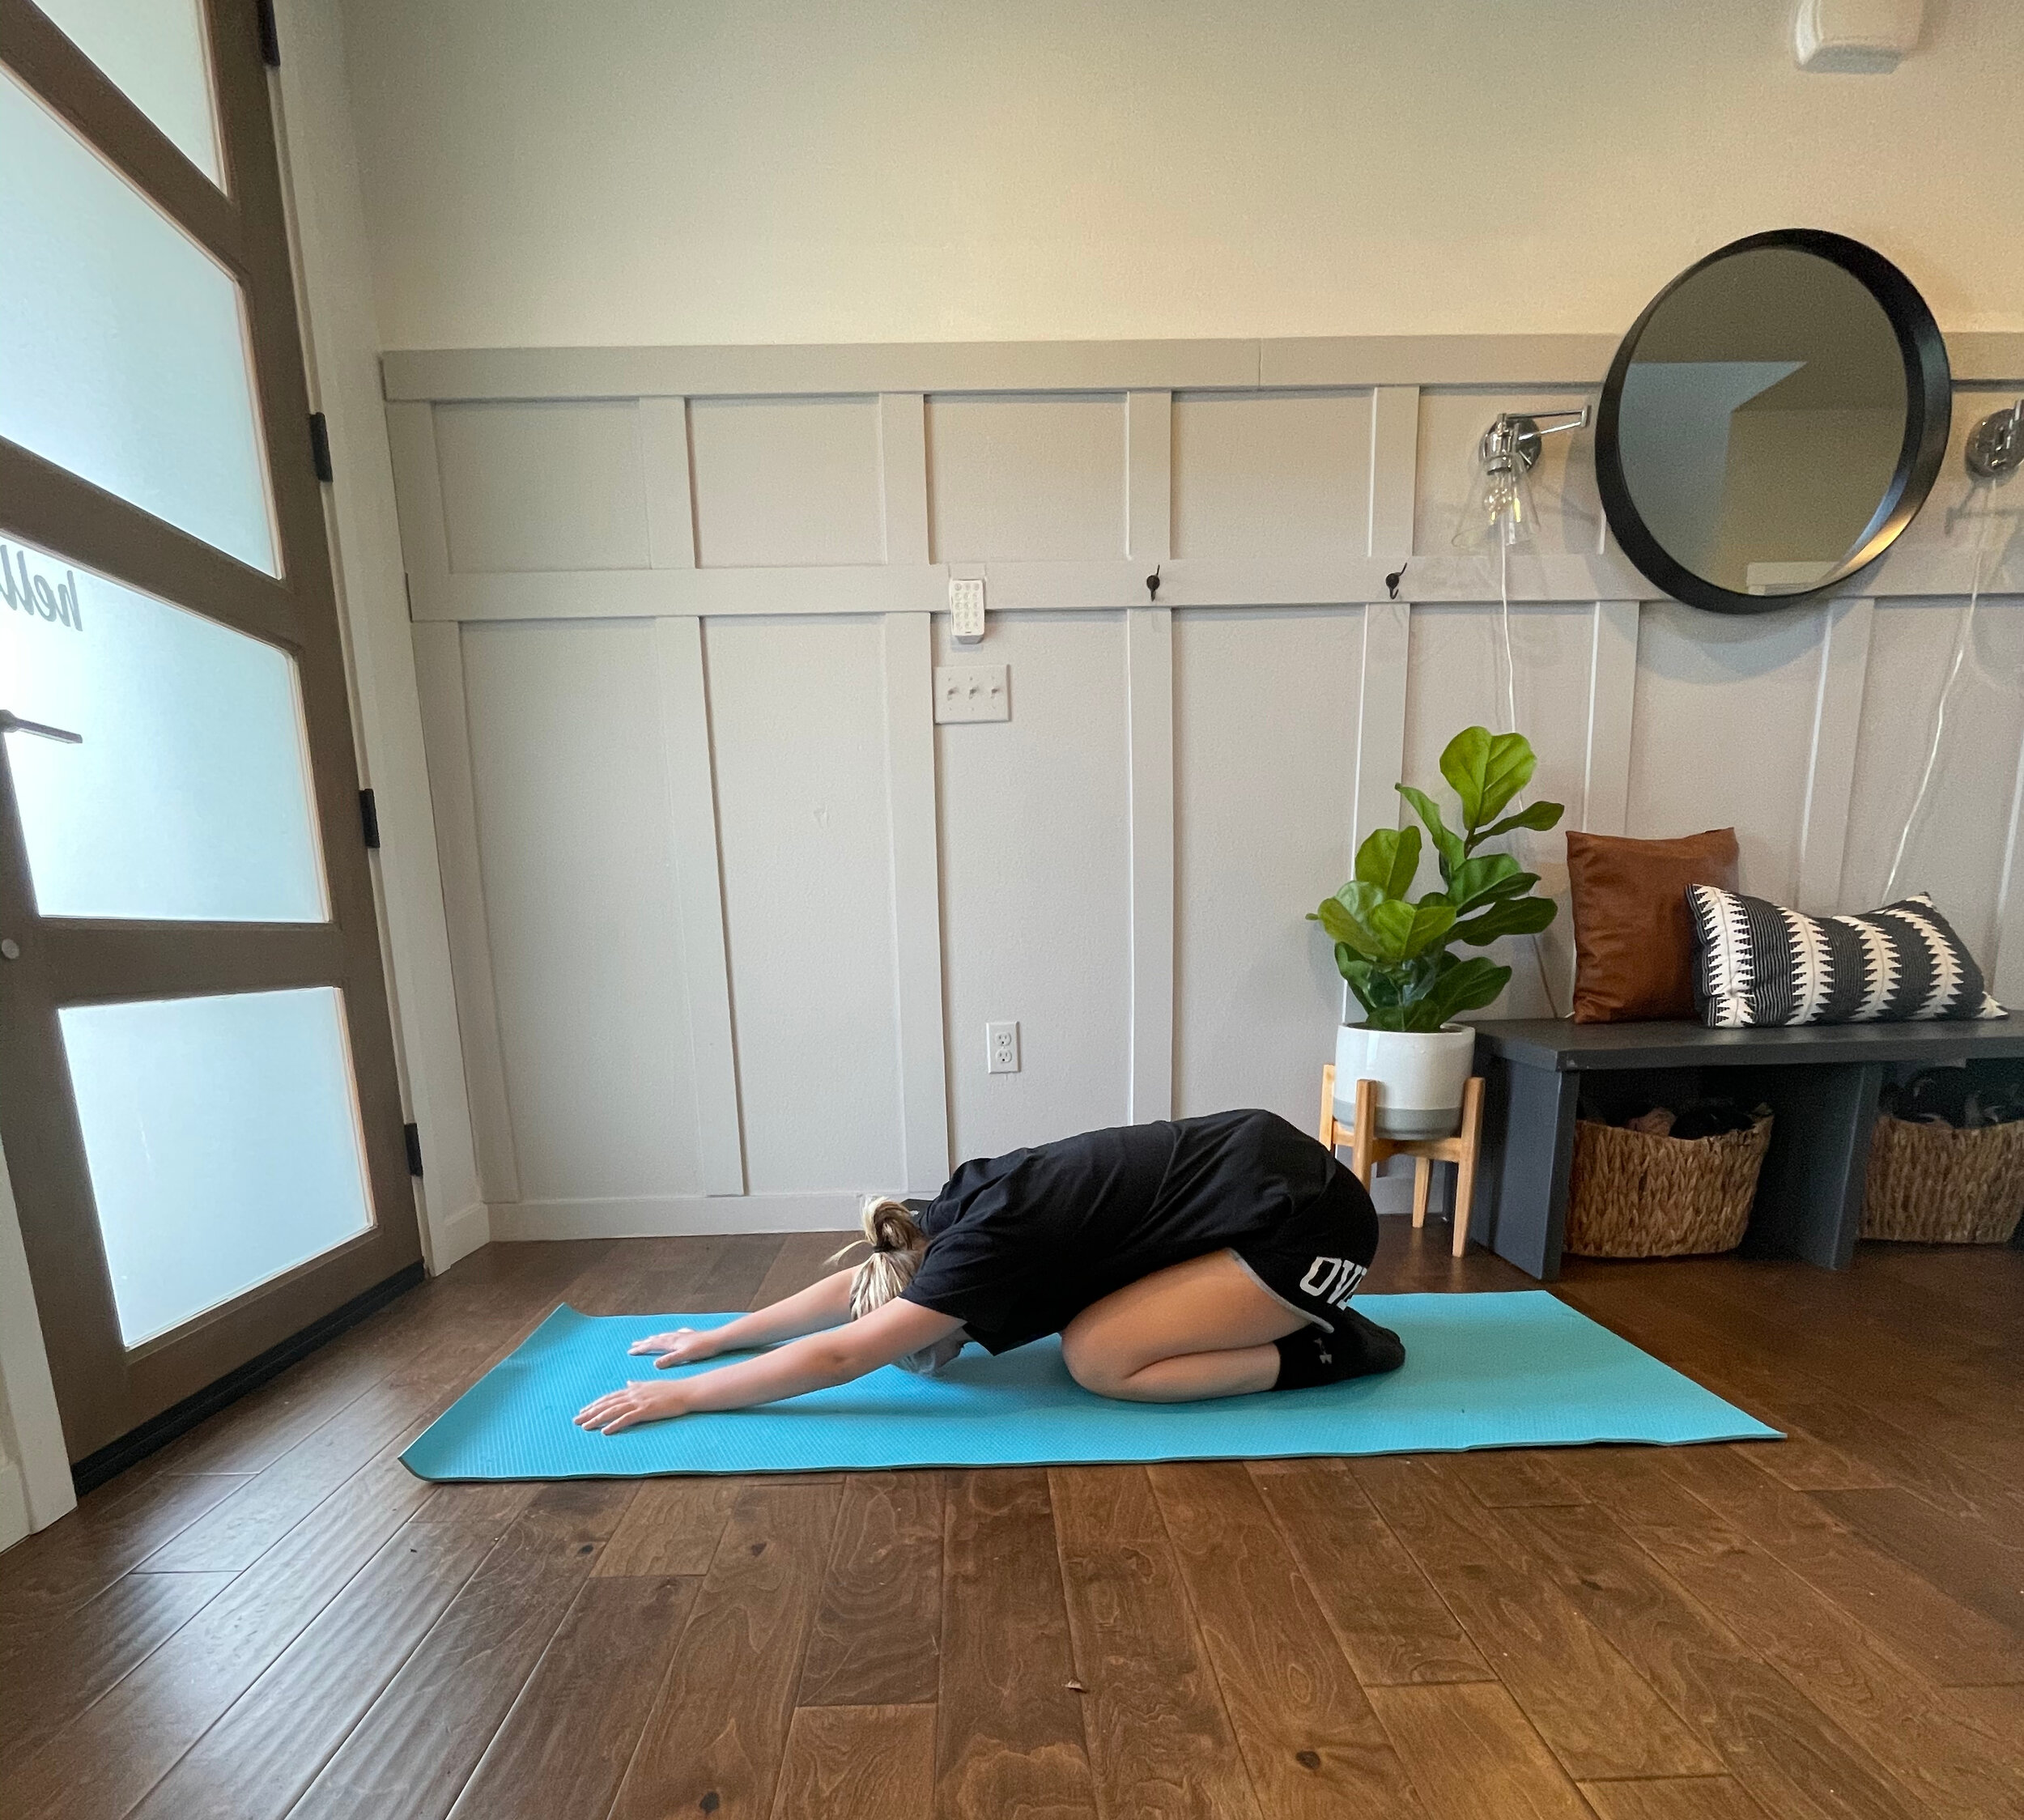
Step-by-Step Instructions
Come to your hands and knees on the mat.
Spread your knees as wide as your mat, keeping the tops of your feet on the floor with the big toes touching.
Bring your belly to rest between your thighs and root your forehead to the floor. Relax the shoulders, jaw, and eyes. If it is not comfortable to place the forehead on the floor, rest it on a block or two stacked fists.
Cat/Cow
The Cat-Cow Stretch (Chakravakasana) involves moving the spine from a rounded position (flexion) to an arched one (extension). Flexing and extending the spine can help improve circulation in the discs in your back. It's a basic motion, but one that can be enormously beneficial in supporting the back and easing pain and maintaining a healthy spine, especially if you spend a lot of time sitting.
Cat-Cow Stretch helps to improve posture and balance. It is also believed to be a good stress-reliever and calming pose, since you link the movements with your breathing.


Step-by-Step Instructions
Start on your hands and knees, aligning your wrists underneath your shoulders and your knees underneath your hips.
Think of the spine as a straight line connecting the shoulders to the hips. Try visualizing the line extending forward through the crown of the head and back through the tailbone. This is the position of a neutral spine.
Keep the neck long by looking down and out.
Inhale and Arch for Cow Pose
Curl your toes under.
Tilt your pelvis back so that your tailbone sticks up.
Let this movement ripple from your tailbone up your spine so that your neck is the last thing to move.
Your belly drops down, but keep your abdominal muscles hugging your spine by drawing your navel in.
Take your gaze gently up toward the ceiling without cranking your neck.
Exhale and Round for Cat Pose
Release the tops of your feet to the floor.
Tip your pelvis forward, tucking your tailbone. Again, let this action move up your spine. Your spine will naturally round.
Draw your navel toward your spine.
Drop your head.
Take your gaze to your navel.
Repeat the Cat-Cow Stretch on each inhale and exhale, matching the movement to your own breath.
Continue for 5 to 10 breaths, moving the whole spine. After your final exhale, come back to a neutral spine.
Cobra Pose
Cobra pose, the alternative to upward facing dog (Urdhva Mukha Shvanasana) increases the mobility of the spine, strengthens spinal support muscles, and can help relieve back pain. It opens the chest and the front of the body.

Step-by-Step Instructions
Start by laying flat on your stomach.
Place your palms flat on the ground directly under your shoulders. Bend your elbows straight back and hug them into your sides.
Pause for a moment looking straight down at your mat with your neck in a neutral position. Anchor your pubic bone to the floor.
Inhale to lift your chest off the floor. Roll your shoulders back and keep your low ribs on the floor. Make sure your elbows continue hugging your sides. Don't let them wing out to either side.
Keep your neck neutral. Don’t crank it up. Your gaze should stay on the floor.
Downward Facing Dog
Doward Facing Dog (Adho Mukha Svanasana) stretches the hamstrings and calves and strengthens the arms, legs, and back. It can help relieve back pain. As a mild inversion, it acts in reverse of the usual forces on your spine and brings more blood flow to your brain. The pose also strengthens the deep abdominal muscles that help stabilize the spine.

Step-by-Step Instructions
You can do this pose anywhere you can lay out a yoga mat.
Come to your hands and knees with the wrists underneath the shoulders and the knees underneath the hips.
Curl your toes under and push back through your hands to lift your hips and straighten your legs.
Spread your fingers and ground down from the forearms into the fingertips.
Outwardly rotate your upper arms to broaden the collarbones.
Let your head hang and move your shoulder blades away from your ears towards your hips.
Engage your quadriceps strongly to take the burden of your body's weight off your arms. This action goes a long way toward making this a resting pose.
Rotate your thighs inward, keep your tail high, and sink your heels towards the floor.
Check that the distance between your hands and feet is correct by coming forward to a a plank position. The distance between the hands and feet should be the same in these two poses. Do not step the feet toward the hands in down dog in order the get the heels to the floor.
Exhale and bend your knees to release and come back to your hands and knees.
Ragdoll Pose
Ragdoll pose (uttanasana) is a basic standing forward bend yoga posture that stretches the lower back. Ragdoll pose is considered a simple variation of standing forward bend.

Step-by-Step Instructions
1. Begin with the feet hip-width apart and the knees flexed.
2. Bend forward from the hips, allowing the head to hang down between the upper arms.
3. Cross the arms and softly grasp each elbow with the opposite hand. To release the back, gently sway from side to side.
Bridge Pose
The yoga supported bridge pose (Setu Bandha Sarvangasana) helps to relieve lower back pain. In the supported pelvic bridge, the core abdominal, back, hip and hamstring muscles work in concert to bring and keep the lower body in the air. It is a multi-joint movement, which many experts believe is the best way to activate, use and strengthen your core.
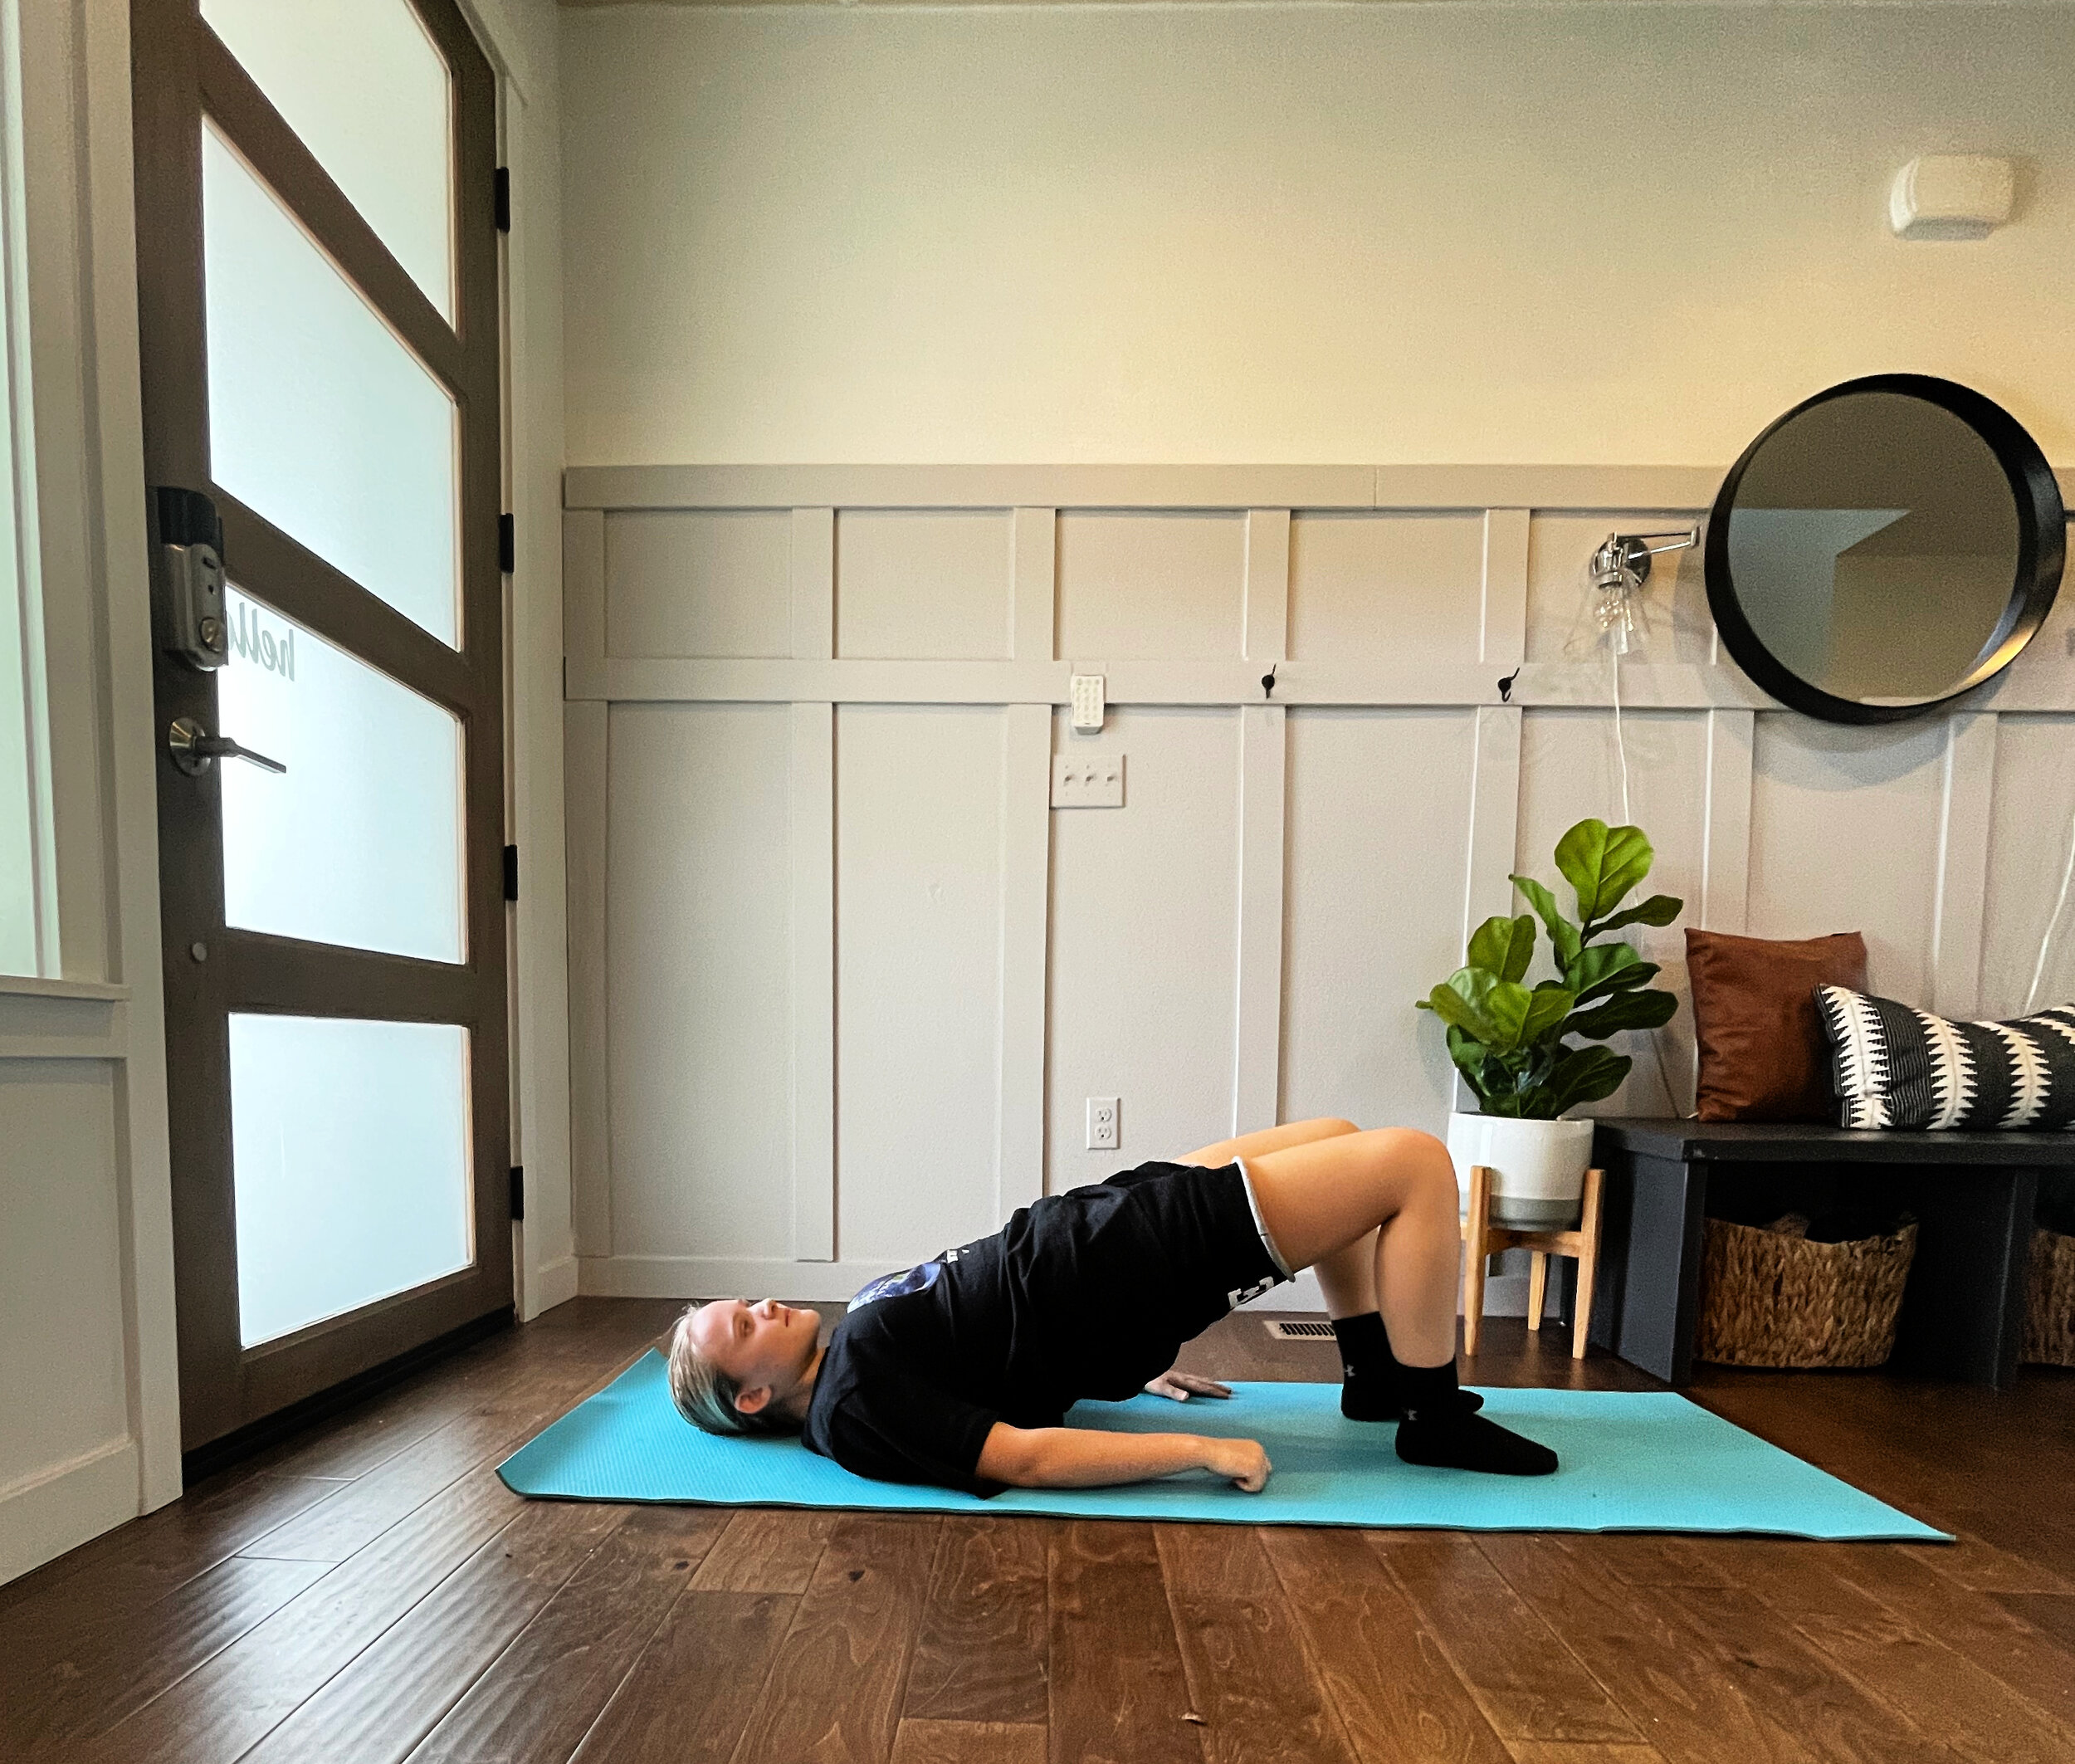
Step-by-Step Instructions
You will need your yoga block or a similar solid bolster handy.
Lie on your back with your knees bent and the soles of your feet flat on the floor.
Extend your arms on the floor with your fingers reaching toward your heels. You should be able to just barely touch the backs of your heels with your fingertips.
Keep your feet parallel. Maintain that position throughout the pose.
Press down into the soles of your feet to lift your hips off the floor.
Slide your yoga block under your back directly under your sacrum, letting it rest securely on the bolster. Your arms can stay outstretched on the floor next to your body.
This should be a comfortable position. You may want to stay here several minutes as your body settles into the stretch and gets the benefits of a passive backbend. If the pose causes your back to hurt, remove the block and come down.
To come out, press down into your feet and lift your hips again. Slide the block out from under your sacrum and gently lower your back to the floor.
The exercises above work best when you combine them with other posture-protecting practices. It’s also important to take frequent breaks as we are distance learning.
Here are some other suggestions for posture protection:
Shift positions every 30 to 60 minutes.
Use a stand for tablets and smartphones when possible.
Make sure your computer, keyboard and mouse are in spine-friendly spots.
Consider a standing desk or treadmill work station to minimize sitting and leaning.
Don’t lie on a sofa or bed while you work.
My girls have been regularly practicing these poses and have already reported relief from their early onset aches and pains. Try these at home with your kids! they will totally love it!!
Namaste!
- Cassy